
How to Use Vermeer RTX-550 Saw Video Transcript
In this video tutorial, we’ll show you how to use the RTX 550 saw properly.
Texas law requires anyone planning to dig, excavate, or otherwise move earth deeper than 16 inches to call 811 before beginning a project to have underground utilities marked. Rocky Hill Equipment recommends calling 811 prior to any project that involves digging with our equipment, regardless of depth.
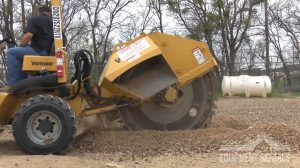 To begin, this is a demonstration of a properly operated RTX 550, and this machine is designed always to drive forward while cutting and never backward. The backfill blade is at the front of the machine, and the circular cutting blade is at the rear. On the circular blade, different components serve their purpose. You have segments, segment bolts, pockets, and rock bits. Rock bits contact the rock material and break it into smaller pieces, thus making your trench.
Let’s go through the operator control layout.
Once you sit, you’ll notice the control handles steer on the right-hand side. The backfill blade is controlled with a black handle; this allows the backfill blade to lift, drop, and turn left to right. By pressing this button on the back of the handle, you can change the angles of the blade if needed. Remember that the backfill blade must be lifted before transporting or trenching. Now, focusing on your right side, you’ll locate the green handle. This handle will allow the circular saw to be lifted and dropped. The gray handle controls the rear steering. This will allow you to maneuver the machine in tight spots when adjusting or moving around objects.
Do not make turns while trenching.
The knobs to the left of the backfill blade handle, you’ll notice they are labeled with the letter R for reverse, the letter N for neutral, and the letter F for forward. Both knobs have to be in ‘neutral’ for the machine to start. Moving to the dashboard, you’ll see the screen displaying the RPM gauge, fuel gauge, and oil PSA. In the top right-hand corner of the dashboard, you have a button speedometer image that allows you to switch screens to show you the hour meter, fuel gauge, battery voltage, temperature gauge, and hydraulic gauge. On the opposite side of the screen, we have the high gear and low gear buttons. When transporting the machine, you can use the high gear option. While trenching, you want the rock saw in low gear. In the center console, you have individual indicators showing you what controls are on, off, neutral, and all fluid components. To the left of the steering wheel, you’ll see the RPM throttle and the safety horn.
There is a tow-to-heel pedal by your right foot. This pedal allows you to move and adjust the machine forward and reverse. It is to be used during transportation and adjusting only.
Operating Procedure
Look to make sure all my handles controls are in neutral and start the machine, turn the circular saw knob to the right till you have reached 100% wheel speed. Next, you want to throttle the machine to full capacity, approximately 2610 RPMs. Once those steps are completed, we’ll lower our cutting blades slowly until we hit the ground. Once you get the depth desired, the next step will be to turn the creeper knob forward slightly. You’ll notice the speed of the creeper and percentage appear on your screen at this point you’ll feel the machine advance slowly, set the creeper speed depending on the material you are cutting through. There will be four triangle shapes visible on the RPM bar image. Try to keep the RPM speed between the shapes, if the RPM drops below that’s a clear indication that your creeper is set too high for the material you are trenching.
While using this machine. We suggest picking up the saw wheel every 5 feet for the first 20 feet and having a spotter get a good visual on the rock pits, pockets, and segments. After your first 20 feet, you can pick up the saw blade every 10 or 15 feet, depending on how comfortable you feel with the material you are cutting through. The purpose of this is to prevent major damages from occurring. When too many rock pits go missing, you damage or break pockets. When finished digging again. Put the creeper in neutral, lift the blade, slow the throttle, and put the cutting blade into neutral. Engage the parking brake and turn off the machine.
When you are finished installing your components into your trench. The RTX 550 can also backfill the material to complete the job. This is done with the backfill blade at the front of the machine and using the foot pedal to advance the machine to the desired location. Position the blade close to the final grade level and at a 45-degree angle, facing the blade to the trench. This will force the tailings back into the trench as you creep forward. This machine is not to bulldozer; only push as many of the tailings as you safely can and as many passes as necessary to fill your trench.
Let’s talk about safety.
Always wear the safety seatbelt, as being thrown from the machine in the event of an accident could cause more severe injury than being locked in place under the roll cage.
Be aware of the terrain, obstacles, overhead hazards, and other workers near your trenching path. Do not lose focus, as trenching can be slow and monotonous, but accidents can happen at any time. Always learn as much as you can about the equipment you’ve rented and its proper operation to complete your job. If you’ll be renting equipment for multiple days, please remove the keys from the equipment and store them in a safe location on your job site.
Please return the equipment in the condition it was ready to you clean and full of fuel. If you have any concerns or issues with the equipment, please call us at 210-651-5611. Let us solve those issues for you because we are committed to service at Rocky Hill Equipment Rental.