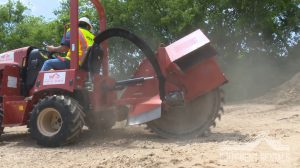
How to Use Ditch Witch RT-45 Saw Video Transcript
In this video tutorial, we’ll show you how to use the RT-45 properly.
Texas law requires anyone planning to dig, excavate, or otherwise move Earth deeper than 16 inches to call 811 before beginning a project to have underground utilities marked. Rocky Hill Equipment Recommends Calling 811 prior to any project that involves digging with our equipment, regardless of depth.
 To begin with, this is a demonstration of a properly operated RT-45 in action. This machine is designed always to drive forward while cutting and never backward. The backfill blade is at the front of the machine, and the circular cutting blade is at the rear. On the circular blade, different components serve their purpose. You have segments, segment bolts, pockets, and rock bits. Rock bits contact the rock material and break it into smaller pieces, thus making your trench.
Let’s go through the operator control layout.
Once seated on the RT-45, you’ll see four different control handles to your right and two to your left. Let’s begin with the right side. This black handle controls the backfill blade and the front. You can lift, drop, and turn left to right with this handle. Remember that the backfill blade needs to be up all the way when transporting or cutting. Next, you’ll see an orange handle nearest you, activating the creeper on the machine. This is only to be used while trenching. You will use this once the machine has hit the desired depth and needs the machine to advance. A circular cutting blade can be lowered or raised with a green handle. We have the parking brake on the orange handle on our left side. The second handle controls the cutting blade in the rear, allowing it to spin. This handle must be pushed forward for the wheel to spin correctly. And you want to push it all the way forward as well.
Now, focusing on the dashboard on the screen, you’ll have a fuel gauge, temperature gauge, and RPM gauge. We can focus on the top of the screen; you should have three icons before starting the machine. Operator properly seated, creeper handle in neutral and finally cutting blade handle in neutral. If one of these three icons is not visible on your screen, that means it’s not neutral, and the machine will not start. By your right foot, there is a total heel pedal. This pedal will allow you to move or adjust the machine forward and reverse. This pedal is to be used during transportation and adjusting only.
Operating Procedure
Inspect the cutting blade’s rock bits to ensure there are no broken, missing, or loose bits on the blade segments. We always recommend to check your rock before, during, and after every use. Look to make sure all my handles are in neutral and start the machine, we will now adjust the rock saw to begin cutting our trench. Once adjusted, we will push the cutting blade handle all the way forward. Next, we will push the throttle, handle the small orange one near the rear of the machine all the way forward, allowing our RPMs to reach max capacity. Once those steps are completed, we will lower our cutting blade slowly until we hit the ground.
This point, we will gradually drop the blade a few inches at a time. We don’t want to push down, causing the machine to stall. Lowering the blade slowly is the fastest way to begin your trench. Once you get the depth desired, the next step will be to push the creeper handle, the orange one, forward slightly. At this point, you will feel the machine advance slowly. While using this machine, we suggest picking up the blade every 5 feet for the first 20 feet and have a spotter. Get a good visual on rock pits, pockets, and segments. After your first 20 feet, you can pick up the blade every 10 or 15 feet, depending on how comfortable you feel with the material you are cutting through. The purpose of this is to prevent major damages from occurring. When too many rock pits go missing, you damage or break pockets. For this step, place the creeper in neutral, keeping the blade and RPMs at full throttle. Begin to pick up the blade. Once the blade is up in the air, you can begin to slow the throttle down the orange near the rear.
Next, pull the cutting blade and yellow handle slowly back into neutral. Now, your spotter can get a good visual of rock pits, pockets, segments, and segment bolts for any damage. If everything checks out, okay, continue cutting. Remember to inspect the cutting blade at least every 15 feet from now on. When finished digging again, put the creeper in neutral. Lift the blade, slow the throttle and put the cutting blade in a neutral, and turn off the machine. When you are finished installing your components in your trench, the RT-45 can also backfill the material to complete the job. This is done with the backfill blade at the front of the machine. You will not be engaging the cutting blade for this operation. Throttle up the machine and use the creeper handle to advance the machine to the desired location. On the right-hand side, the lower handle is used to control the depth and angle of the backfill blade. Position the blade close to the final grade level and at a 45-degree angle, facing the blade to the trench. This will force the tailings back into the trench as you creep forward. This machine is not a bulldozer. Only push as much of the tailings as you safely can and as many passes as necessary to fill your trench.
Let’s talk about safety.
Always wear the safety seatbelt, as being thrown from the machine in the event of an accident could cause more severe injury than being locked in place under the roll cage.
Be aware of terrain obstacles, overhead hazards, and other workers near your trenching path. Do not lose focus, as trenching can be slow and monotonous. But accidents can happen at any time. Always learn as much as you can about the equipment you’ve rented and its proper operation to complete your job. If you’ll be renting equipment for multiple days, please remove the keys from the equipment and store them in a safe location on your job site.
–
Please return the equipment in the condition it was ready to you: clean and full of fuel. If you have any concerns or issues with the equipment, please give us a call at 210-651-5611. Let us solve those issues for you because, at Rocky Hill Equipment Rental, we are committed to service.
