How to Use RT 105 Trencher Video Transcript
How to Safely Operate the RT 105 Trencher
In this video tutorial, we’ll show you how to properly use the RT 105 trencher to begin this is a demonstration of a properly operated RT 105 trencher in action.
Safety First: Call 811 Before Digging
Anyone planning to dig, excavate, or otherwise move Earth deeper than 16 inches is required by Texas law to call eight one, before beginning a project to have underground utilities marked rocky hill. Equipment recommends calling 811, prior to any project that involves digging with our equipment, regardless of depth.
Getting to Know Your Trencher Controls
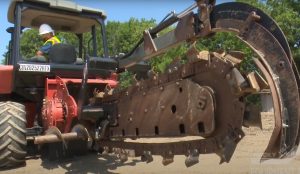
This machine is designed to always drive forward while cutting and never backward. The backfill blade is at the front of the machine, and the cutting chain is at the rear. On the right hand side, we have the back fill blade handle. Underneath that handle, we have the creeper knob to the right, there are two switch controls. To the right, we have the switch that activate the chromer in the rear, the chromers, purpose is to clean out the trench as the machine advances forward, the last switch will allow you to go up or down on the cutting chain to the left of the seat, underneath is a switch that activates the trenching mode and the transporting mode.
Additional Control Features
This machine has two modes, and you can change the modes by applying the machine’s brakes and pressing the option you want at the same time. At that point, the screen on the machine will indicate what mode is activated.
 To the right, we have the parking brake just over that switch, you have the throttle switch behind the steering wheel, you’ll see a handle that’ll activate the machine to move forward or backward, and by twisting the handle, you can change it to first or second gear. This handle will also activate the chain only when the machine is in trencher mode and you have first and second gear as an option as well.
Focusing on the screen, you have fuel depth, hydraulic oil pressure and battery voltage gages. Top of the screen, you have both modes available for this machine.
Routine Inspection and Maintenance of Trenching Equipment
To the left is the trenching mode. To the right, you have the transport mode. Whichever indicator is highlighted in green is going to be the active mode, operator procedure, inspect the chain and teeth to make sure there are no damages or teeth missing.
We always recommend checking your teeth before, during and after every use, look to make sure all my handles are in neutral and start the machine. Drop the cutting chain about half way. And before you start cutting, make sure you switch over to trenching mode. Apply the brakes and switch to trenching, push the handle behind the steering wheel forward. Change should activate at this point, push throttle switch to max capacity, and then twist the handle to second gear to get max speed.
Operating Procedure for the Trencher
Once you’ve reached the depth needed, you can start to turn the creeper mode forward, adjusting to material at the job site. While using this machine, we suggest picking up the chain every five feet for the first 20 feet, and have a spotter get good visual on the teeth after your first 20 feet, you can pick up the chain every 10 or 15 feet, depending on how comfortable you feel with the material you’re cutting through the chain room has four different grease points that need to be greased every one to two hours, tail Roller, auger, bearing, head, shaft point and trencher pivot.
Post-Digging Shutdown
When finished digging again, put the creeper in neutral, lift the chain, slow the throttle and put the cutting chain into neutral. To change the machine from trenching to transport mode, you would have to apply the brakes and press on the switch for transport mode. Once the indicator is highlighted in green, you know the transfer was successful before shutting down the machine, make sure all controls are in neutral and the parking brake
is activated.
Post-Operation Procedures
Always learn as much as you can about the equipment you’ve rented and its proper operation to complete your job. If you’ll be renting equipment for multiple days, please remove the keys from the equipment and store in a safe location on your job site. Please return the equipment in the condition it was rented to you, clean.
And full of fuel. If you have any concerns or issues with the equipment, please give us a call at 210-651-5611,
and let us solve those issues for you, because at Rocky Hill equipment rental, we are committed to service.
